Bootstrap Checkbox State
Introduction
In some instances the simplest aspects might just get pretty critical-- most especially as you get to need them. For instance how do your website visitors connect with the pages you set up stating a basic Boolean action-- simply yes or no regarding a couple of the questions you have to request, just how they do accept the conditions and terms or maybe line up a handful of the feasible selections they might have. We usually surpass this without paying very much of an care to the feature responsible for these sorts of actions however the Bootstrap Checkbox Class is actually a very important component-- one our forms just can't really complete without.
Located in current fourth edition of the Bootstrap framework we are delivered with the .form-check and also .form-check-label classes to showcase the good old default checkbox feature and in the event that you would probably need to have them piled simply just ensure you have actually wrapped them in an additional <div> with the .form-check class specified to it. In order your checkboxes to showcase properly in Bootstrap 4 you have to additionally specify the .form-check-label class to the <label> element and the <input> tag itself should carry the .form-check-input class.
Steps to put into action the Bootstrap checkbox:
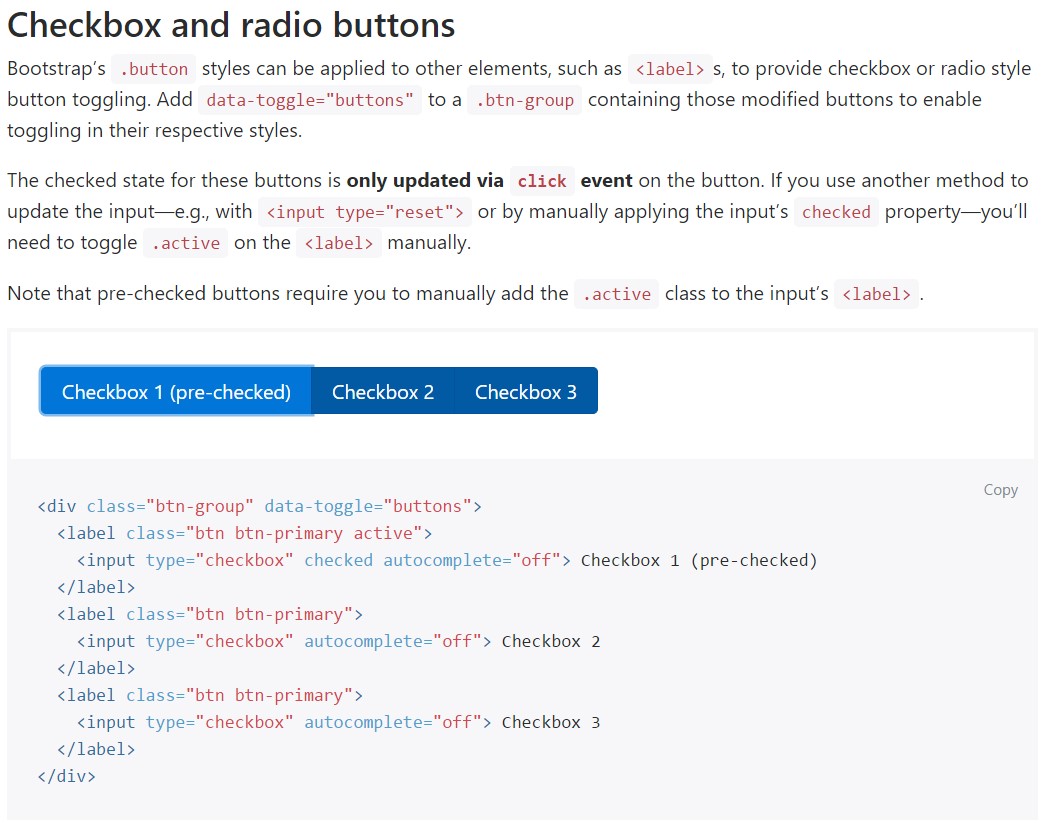
Bootstrap's .button styles can be put on other types of elements, including <label>- s, to produce checkbox or radio style button toggling. Add data-toggle=" buttons" to .btn-group including those modified buttons to allow toggling in their respective styles. The reviewed state for all of these buttons is only up-dated with click event on the button. If you use another approach to update the input-- e.g., with <input type="reset"> or by manually applying the input's reviewed property-- you'll will need to toggle .active on the <label> by hand.

<div class="btn-group" data-toggle="buttons">
  <label class="btn btn-primary active">
    <input type="checkbox" checked autocomplete="off"> Checkbox 1 (pre-checked)
  </label>
  <label class="btn btn-primary">
    <input type="checkbox" autocomplete="off"> Checkbox 2
  </label>
  <label class="btn btn-primary">
    <input type="checkbox" autocomplete="off"> Checkbox 3
  </label>
</div>
In certain cases we need the checkboxes to be within our forms without the user really having the capacity to take any sort of activity clicking them-- that is definitely where exactly the disabled option shows up.
In order to disable efficiently a checkbox in Bootstrap 4 employing the standard HTML attribute disabled attribute along with simply just including it you could in addition style the pointer in case the site visitor hovers over the disabled component making it to a "not allowed " icon producing your forms much more straightforward and user-friendly to deal with.
In case you appreciate the suggestion and actually want to accomplish this you have to specify the .disabled class to the parent .form-check component in turn the result to display ideal while the whole element has been hovered-- this will get relatively more obvious
One more representation
When you are employing checkboxes, wrap them in a <label> element having the Bootstrap 4 .custom-control plus .custom-checkbox classes applied.
Apply .custom-control-input on the actual <input> element.
Additionally work with two <span> elements: one with the .custom-control-indicator class utilized, and the other with .custom-control-description ( and also insert the actual label within this element).
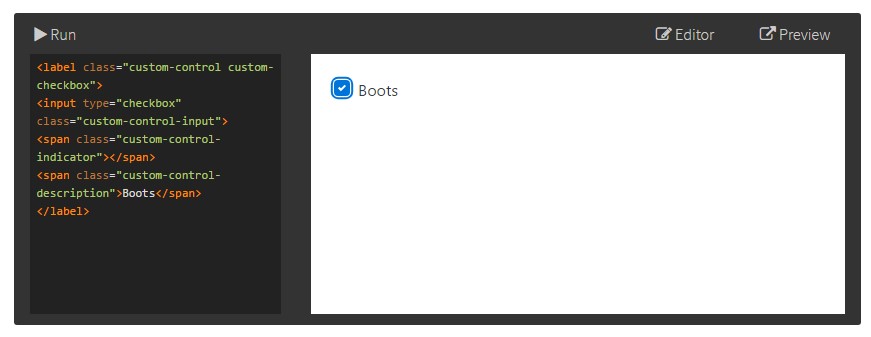
<label class="custom-control custom-checkbox">
<input type="checkbox" class="custom-control-input">
<span class="custom-control-indicator"></span>
<span class="custom-control-description">Boots</span>
</label>
Bootstrap Checkbox Toggle forms
Default checkboxes and radios are raised upon with the support of .form-check, a specific class for both input types that improves the layout and activity of their HTML features. Checkboxes are for selecting one or else several selections in a list, while radios are for choosing one option from many.
The disabled class is going to at the same time light up the text coloration to help indicate the input's state.
A brand new element for the Bootstrap edition 4 framework is the integrating of the so called custom made form features. These are actually the very same components we are known in practicality but styled far more desirable and with the Bootstrap manner. By using them you can certainly provide amazing excitement as well as style to your web content with simply specifying a couple of extra classes to the commands you involve in your forms.
In order to apply custom-made checkboxes wrap them inside a <label> element specifying to it the .custom-control and .custom-checkbox classes. When making the <input> element confirm you have in addition provided the .custom-control-input to it. You need to also utilize two <span> elements - one with .custom-control-indicator class employed and other possessing the .custom-control-description class as well as the actual information you would definitely require to assign to the label your Bootstrap Checkbox Example.
Conclusions
That's essentially all that you must handle in order to include a checkbox element inside of your Bootstrap 4 powered web pages and provide a number of custom made flavor to it adding it a stylish appearances. Now everything you ought to do is repeat the exercise unless you have actually reviewed every one of the checkboxes wanted are actually on the web page.
Inspect a few video guide regarding Bootstrap checkbox
Linked topics:
Bootstrap checkbox approved documentation
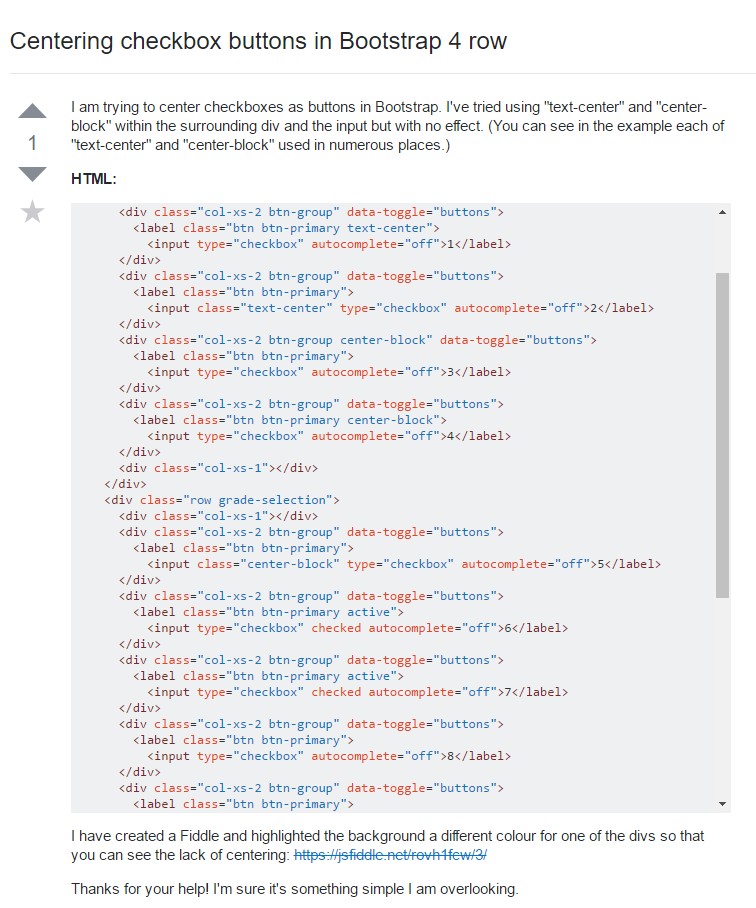
Centering checkbox buttons in Bootstrap 4 row
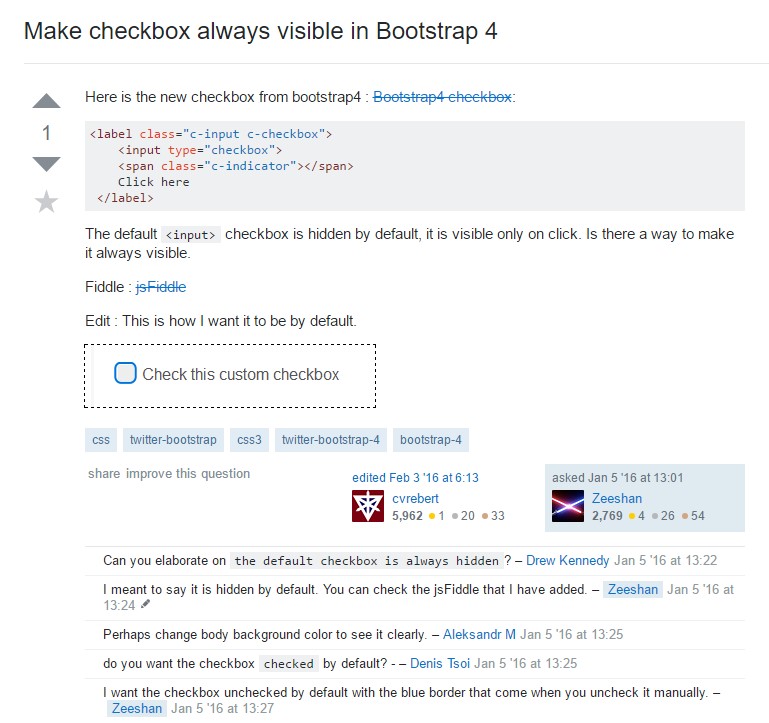
Make checkbox always visible in Bootstrap 4